Friday, March 30, 2012

The Hello Goodbye Series: Skillet Replacement

Look back at this post for more details about the 'Hello Goodbye Series'.  

The focus of this post continues to be the removal of teflon in our kitchen.  Our stainless steel sauce pans have been working out wonderfully, but we needed to find a replacement for our frying pans as well and decided to give cast iron a try.  We purchased a pre-seasoned Lodge cast iron skillet (They are available at Target, and are not terribly expensive costing $18.99 for a 12 inch pan.)

Hello Cast Iron Beauty:


Good Bye Teflon Coated Pan with the wonky handle:


Has anyone else been using cast iron?  Any seasoning tips?  We've been using ours for several weeks now, and we don't have any complaints!

Have a wonderful weekend everyone!!

Wednesday, March 28, 2012

Basement Update: Oscar Stays!!

When I wrote about our basement clipboards, I mentioned that I wasn't sure whether to keep or return Oscar the Rug.  I ended up keeping him.  The green wasn't what I was expecting, but the price was right and the texture was right so I unrolled it,  and the green grew on me.  Here's how our basement looks now:

We also picked up a Hovas ottoman from IKEA.  We considered buying 2 Karlstad foot stools, but it was too busy looking for my liking with all those legs.  I like the 1 huge ottoman.  It's a little strange that it's skirted and our Karlstad sectional isn't, so I have some tweaks in mind for the ottoman. Overall though, we LOVE this ottoman.  It turns our sectional into the most comfortably huge sofa in the whole wide world.  We often push it into the corner of the sectional so that both sides are touching the couch...so awesome!


I don't believe that I've shown our TV/fireplace wall as of late, so here it is:
Down the road, we'll add some built ins on either side of the fireplace and finish the fireplace off with some stacked rocks or some molding.


For awhile, we had an old 'kid' computer on this West Elm Parsons Desk (purchased for $50 on Craigslist).  The computer broke.  The desk stayed.


This desk was finished last fall during our big garage paint-a-thon.  It was $20 from Craigslist.  I painted it with Rustoleum's oil based paint, and we cleaned up the hardware.  


The best part of our basement as of late, however, is the box that our ottoman came in:

We turned it into a school bus, and the kids can't get enough!!

Linking up to Miss Mustard Seed.
Linking up to Thrifty Decor Chick.
Linking up to Primitive and Proper.

Monday, March 26, 2012

Charm's Room Reveal!


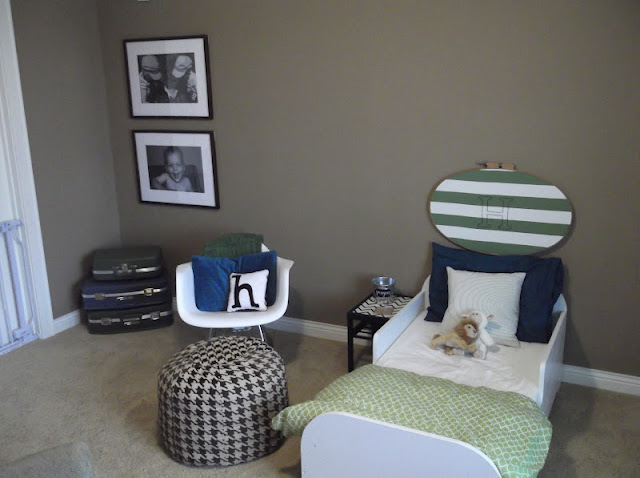
At long last, Charm's room is complete...you know, just in time to move him to a twin sized bed:).  I started working on it early last summer, so it really does feel like it's been a never ending project.

Just as a reminder, here is what the room looked like back in July:


And here it is now:


I already posted about most of the major projects like the gutter book shelves, the gallery wall, the desk area, the wave artwork, the pouf, the night stand and the clip board wall art.  In addition, I made the 'headboard' art using a thrift store embroidery hoop, fabric from IKEA and embroidery floss to sew on an 'H'. 


I also made him a duvet cover using a fun green organic cotton fabric that I purchased at Fabric.com.     


I made the curtains using fabric from IKEA.  (It has since been discontinued, but was called Monalis.)  The fabric wasn't cheap at $8/yard = $48 for two panels (not my usually cheapo standards), but I just loved the pattern, because it reminds me of a tree house which reminds me of little boys, which reminds me of Charm.  I also sewed in a liner to keep it nice and dark during day time naps.  The liner was on sale at Joann's 50% and I had a bonus take an additional 25% off sale prices coupon, so it was $15 for 6 yards. 


I updated his chalkboard globe recently with the famous line from Dr. Seuss, "Oh, the places you'll go!".  Fitting that it's written on a globe, no? 


Ta-Da!

What do you think?  Anyone else finish a never ending room as of late?  What a great feeling it is to finally get 'er done.  And now, it's time for me to focus on the next room or two.  Or three.  :)

Hope you had a wonderful weekend.  Spring is here in Minnesota!!  Don't forget your sunscreen!

Linking up to Finding Fabulous.
Linking up to Thrifty Decor Chick.
Linking up to The Rooster and The Hen.

Friday, March 23, 2012

Charm's Winnie the Pooh Wall "Art"

 If you are familiar with this quotation by A.A. Milne from the Winnie the Pooh series:

“If ever there is tomorrow when we're not together... there is something you must always remember. You are braver than you believe, stronger than you seem, and smarter than you think. But the most important thing is, even if we're apart... I'll always be with you.” 

Then you know that it has to be one of the most appropriate quotations for a child's bedroom.   I seriously love it, and honestly wish I would have wrote it to my children myself:).  I actually considered doing a painting with this quote in Lucky's room on a big empty canvas that I am currently in the process of working on...more on that later.  I also seriously thought about purchasing this print from an Etsy seller in orange for one of the frames in Charm's Gallery Wall that I later filled with a vintage-like t-shirt:

Raw Letter Press
  I may need buy a black and white copy of it anyway for my room:)!  I love it that much!

Anyway...I decided to fill one little corner of Charm's room with a chalkboard paint covered clip board version of the sweet sentiment:


Now, Charm can never forget how amazing he is and most importantly, how much he is loved!!

And with this post, all I have left to post about regarding Charm's room (for a little while anyway) is the final reveal...coming to a blog near you (this blog, that is) next week!  Have a wonderful and relaxing weekend!!

Thursday, March 22, 2012

Night Stand Update

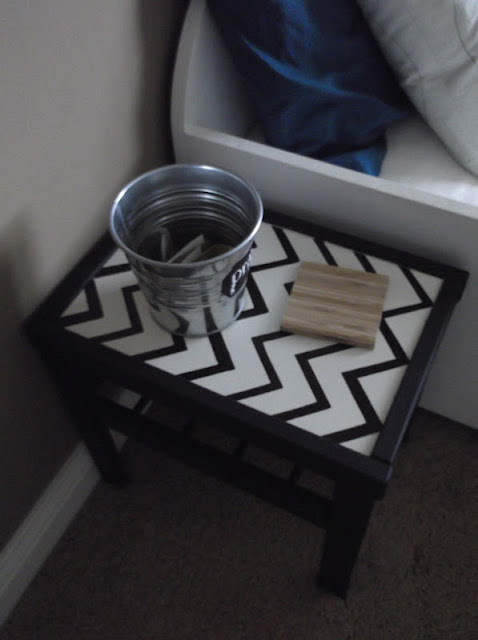
Charm has a 'night stand' in his room that was all white.  His bed is also white.  His chair is....you guessed it, white.  I decided that he needed some variety and the easiest thing to paint was his night stand, which was originally from IKEA a few years ago and was natural pine colored at one point.  I failed to take a great 'before' picture.  Can you see it in this picture on the middle far right side??  


I painted the majority of the night stand with two coats of the black chalkboard paint that I seem to be using on EVERYTHING.  (Just wait, tomorrow I'll post about one final chalkboard project for Charm's Room.)  I have no intention of using chalk on the little table.  I just wanted it to be black.  Next, I was inspired by this dish towel that I picked up at Target on clearance for a dolla fiddie.  


I got out my trusty card board chevron stencil and recreated the pattern with a Sharpie marker on the top of the table/stand.  (I would have painted it, but the top is some kind of plastic-y surface that wouldn't allow latex paint to adhere to it.  I know this from experience.  I peeled the paint right off the top on my first attempt.  Ahh well.  Live and learn.  I didn't want to bother with primer, so I chose the Sharpie-stencil route.)


We use this table mainly as a place to rest Charm's night time water.  I also added a little container that had been in our pantry awhile back.  We've been writing out nightly prayers and adding them to our containers.  The kids are really enjoying this activity, and it's a good reminder for us to keep up with our nightly prayers.

I may have to save some of these prayer intentions for Lucky and Charm to read down the road:).

Wednesday, March 21, 2012

Charm's Desk Area

In Charm's Room, there is a built in desk that was looking like this:

In several years a decade, this will be really useful and wonderful, but for now, there wasn't much going on here, except some nice diaper storage in the cabinet above the desk.  I brainstormed about ways to make this area practical and fun.  

Here is how the space looks now:


I lined the bookshelves above the desk using clearance Christmas wrapping paper and foam core from the dollar store.  I used a cardboard chevron 'stencil' to make a light pattern on the silver paper.  The chalkboard globe on the top shelf is the same one from this post.  His dog bank was a gift, and the car night light up top was a clearance Target find.  The white boxes on the middle shelf are from IKEA and were 50 cents each on clearance.  The bottom shelf contains Charm's journals wrapped with brown craft paper.  The mushroom bookends were Target clearance finds for about $3 each. 


I painted the back wall with black chalkboard paint, including the area under the desk.  On top of the desk is a zig zag bookshelf that reminded me of the Lack Zig Zag shelf from IKEA that I've always loved (I think it's been discontinued because I couldn't find it online.)  Mine was $3.99 from Goodwill and it was red.  I spray painted it green last fall.  The pictures on the wall in this section are photocopies of all of Charm's grandparents as kids.  Bill and I are on the opposite wall...sort of...I still need to find a picture of Bill that will work, so there is a place holder for now.  The plus signs are just chalkboard vinyl that I cut out and stuck to the wall:)!


The area below the desk was turned into a fort!  I made mini-curtains and hung them with a tension rod.  


We made art work for the space using more of the small square canvases that we used in his gallery wall.  I painted the bike.  Charm painted the abstract piece.  I painted the 'h' over a piece of wrapping paper that I stapled on top of a canvas that has an extra Charm footprint underneath it.  I just couldn't paint over it.  This overall area serves as a space ship, a submarine and an airplane.  Charm or Lucky draw the 'buttons' for controlling the boat/rocket/etc using chalk on the back wall.  One of my absolute favorite things to do in the whole wide world is to sit in his room and watch Charm's imagination soar! 


I have just a couple more projects to complete in his room, and then I'll be able to call this room 'done', for a little while anyway.